Showing posts with label Trash to Treasure. Show all posts

Thursday, October 31, 2013

Dining Room Do-Over


While I've taken a break from Blogging, I haven't taken a break from getting crafty at home.  My latest project is my Dining Room Do-Over.  I'm slightly (Okay, VERY) obsessed with completing projects with a minimal budget to prove that design doesn't have to cost a fortune!
Although I LOVE red, I'm always drawn to blues (I'm pretty sure it's my power color) and have very little blue in my home.  That is about to change...

I gave myself a $250 budget and recruited a SMOKIN' HOT handyman.
Here is my BOOOOORING dining room before

I can do ANYTHING with a can of spray paint!  Seriously powerful stuff!

I started by priming and spraying painting the china cabinet that was already in the dining room.  After the paint dried, I used a dry brush and an antique glaze.  I also sprayed the hardware with my favorite hammered spray paint and I just LOVE the way the piece turned out!

 While I was spraying my life away, my Smokin' Hot Handyman was painting the dining room walls the most beautiful teal color.  Honestly, it is STUNNING! 
Paint Color: Glidden Totally Teal

Now, I have used MANY paint brands and I must say that Glidden Paint and Primer in One is by far the BEST paint I have EVER used... Hands Down!


While Mr. Smokin' Hot Handyman painted the room, I sprayed the other pieces a cooridinating color.
 
I also sprayed the chandelier and added some of the antique glaze.  I sprayed the shades as well... See, I can do ANYTHING with spray paint!
I purchased a new rug, mirror, decorative plates, flowers, and decorative tray.

I added a few pieces that I already had around the house.

And Wah-Lah!

This project came in just slightly under the $250 budget with paint, spray paint, brushes and decorative pieces.  I will added a few more pieces soon, but that's how design works... always evolving! 


**UPDATE** I am slowly adding touches throughout our new dining room, including a monogrammed burlap runner, family photos and the cutest little hooter!
 

Pin It

Wednesday, April 14, 2010

Window Redo - Trash to Treasure


What's more fun than taking something from Trash-to-Treasure?

Spending less than $15 to make it SPECTACULAR!

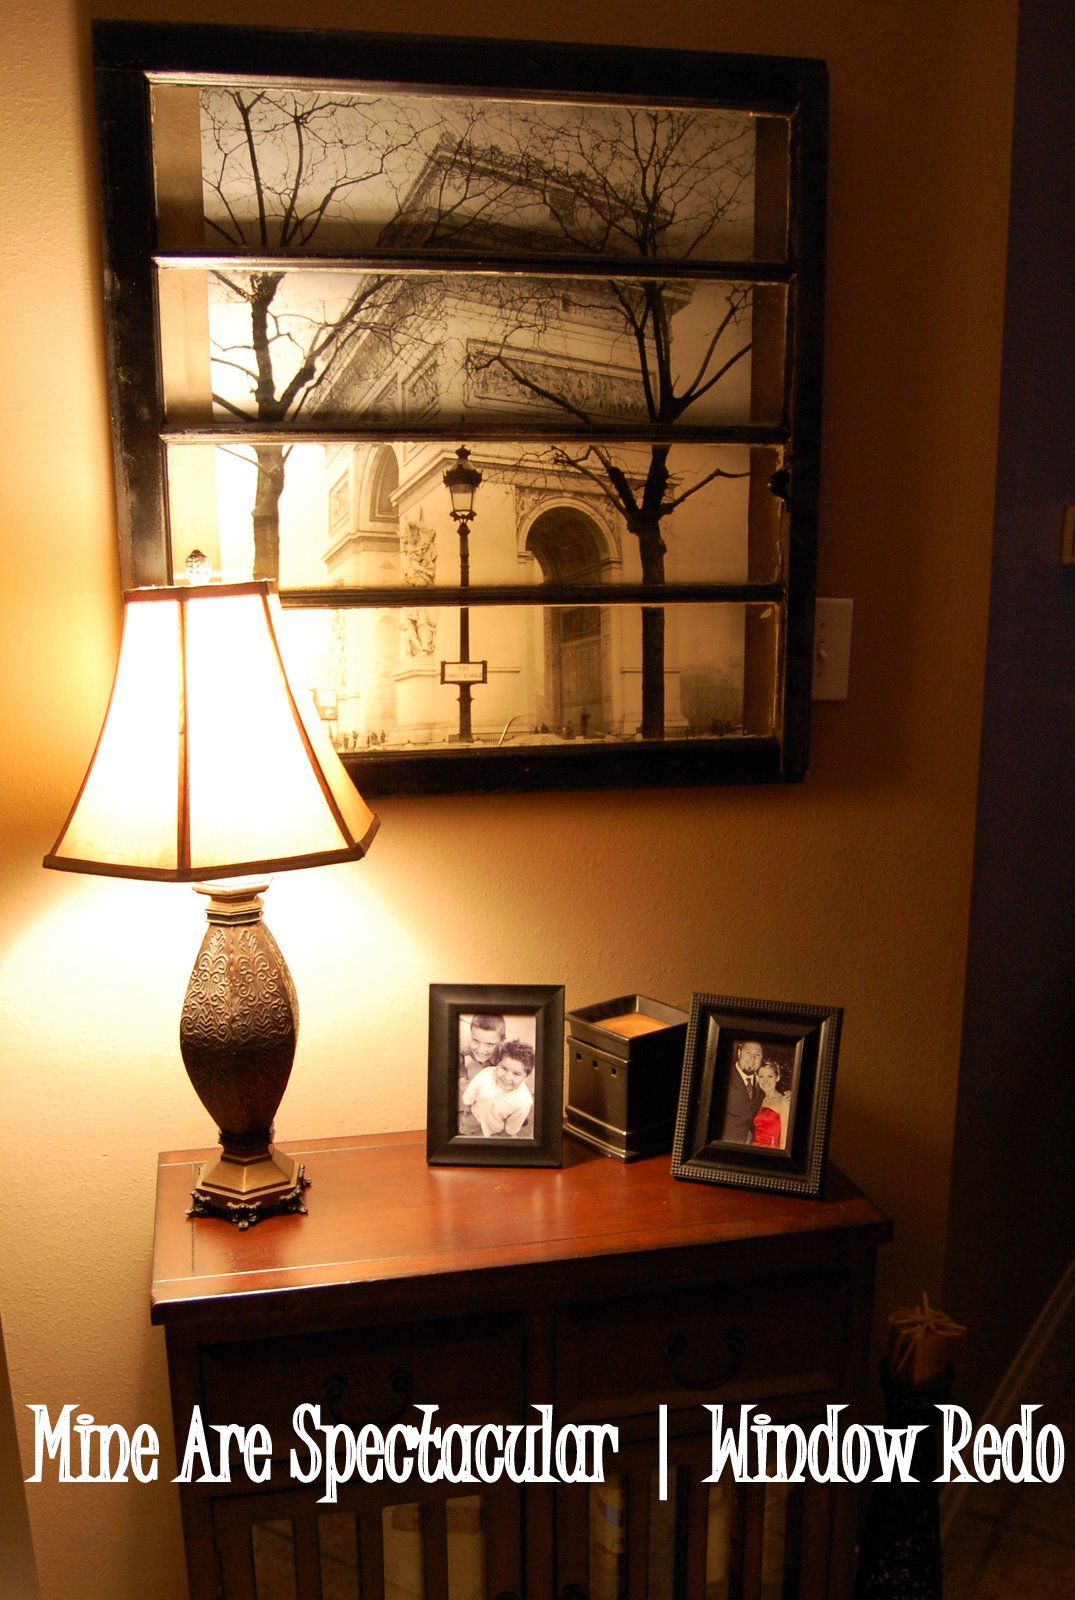
A girlfriend of mine was getting rid of this antique window and I just knew that I could figure out something to do with it. I've spent the last few months trying to decide how I wanted to display it. Well... I FINALLY decided!

Here's what you need:

Paint & a Poster to match your home decor (Yep, that's it!). OH, and the window of course.
Or... use the window to frame family photos.

Before


Slightly Sanded and Painted Black

I sanded the window frame slightly, because I still wanted the window to have an aged look even after I painted it. Once the paint dried, I went back and sanded the edges a bit to look a bit more weathered.


While the window is drying, cut the poster that you chose into the same size as the window panes and attached them from behind with an adhesive (I used a heavy duty tape).

And there you have it... A Window Redo!!


I happen to absolutely LOVE this project!!

I still have another antique window, but I have a different idea that I want to try.

Stay Tuned...
Showing some Linky Love... For more ideas, visit these blogs!

Making

Keeping It Simple


Photobucket


Pin It

Wednesday, October 14, 2009

Glowing Ghouls

I am LOVING these Glowing Ghouls from Not So Idle Hands!!
I cannot get enough of ALL the fun Halloween crafts and decorations. These goblins really top it off... SO simple & SO cute!! I am definitely trying this out over the weekend!!
See below for the tutorial...


Glowing Monster Jars @ Not So Idle Hands (These are too cute! Tutorial here.)
Pin It

Sunday, October 11, 2009

Magnet Magic - Tutorial

I made these magnets at Father's Day for all the guys in my life. They are SUPER simple and fun and I thought I'd share a tutorial with you.
Here is what you will need:
(Plus a pair of scissors and the scrapbook paper, picture or design you want.)
Make sure you use good quality magnets, not the flat strip kind. They stink! I used Mod Podge, and know that it works really well. Also, I used E-6000 because it's a super strong permanent glue and there is no doubt that the magnets are on for good!

Step 1: Place the glass marble over your paper, situating it how you like it. Trace around them with a pencil. If you are using paper with a random pattern, you could probably just skip this step. Perfection is not required!
Step 2: Holding the marble and the paper firmly, cut around the edge of the paper so it is just slightly smaller than the marble.
Step 3: Use a sponge brush to spread a thin layer of Mod Podge on the flat side of the glass marble.
Step 4: Press the glass marble firmly over the top of your cut paper. Make sure the paper is centered. Turn it over and spread out any air bubbles if you need to.
Step 5: After your glue is completely dry, trim any paper edges that are poking out behind the marble.
Step 6: Apply a small amount of E-6000 to the back of your magnet.
Step 7: Press the magnet firmly onto the back of your glass tile. You will be able to wiggle it around till it is in the center.
Step 8: Let the glue dry for about an hour. Then hang up your new magnets.
Stand back and admire your work!
There are so many possibilities with these magnets. I also used small family portraits, and you could use fabric, wallpaper or monograms. They are super quick and easy. I've had many questions regarding the pictures I used and I must admit that I am a Flair freak on Facebook, so my pictures were simply cut & pasted from Flairs on Facebook.
If you are giving them as a gift, you could use a small Altoid tin (dressed up, of course!). It is the prefect size for 6 of them and the magnets stick to the metal tin!
Pin It

Friday, October 9, 2009

Handmade Parade

crafts, scentsy, crosses, bling, holiday decor, candles

(Click on flyer to enlarge)

COME ONE,COME ALL!!!

We will have Unique craft and Boutique style items such as Silpada,Premiere and Bottletop Jewelry,srapbook items,Scentsy candles,wall crosses,home and holiday decor,Mary Kay cosmetics.photography, yummy desserts and Misc. Bling Items.

YOU WON'T WANT TO MISS THIS!!!!!!!!
Pin It

Sunday, October 4, 2009

Not-So-Warm Welcome

So... When you walk up to my home, this is what you see. It's a not-so-warm welcome!
I MUST do something about this quickly, because it is making me CRAZY!!
(BTW - The trees have been trimmed, so you can actually see my house now. Yeah Me!)


I could just go buy a new door, but what's the fun in that?!

Should I sand and stain? Should I paint? Or should I suck it up and buy a new door?

Since my shutters are black, I thought it would look great to have a black door, but BLACK?! I think I am warming up to the idea... this will definitely be my next projects and I am on a mission at make walking up to my home a Warm Welcome!

Pin It

Sunday, September 20, 2009

Inspired by Ballard Designs

I've had an empty wall in the living room and I've been clueless on what I should do. I saw the artwork below in Ballard Designs catalog and then stumbled upon Thrifty Decor Chick's blog and she was inspired by the SAME artwork!!
That was my sign...
Ballard Designs beautiful artwork = $200

Ballard Art

This project was incredibly easy, that even the not-so-crafty gals out there will be able to tackle this one with no problems!
crafts, art, scrapbook, thrifty, decor
Here is what you'll need:
9 - 12" x 12" pieces of MDF
9 - Sheets of Scrapbook paper - You can use and paper you like. Some of my pages were embellised with glitter.
1 can of matching spray paint - I used a chocolate brown to match my decor
1 can of spray adhesive
Nails for hanging

crafts, art, scrapbook, thrifty, decor
Spray all edges of the MDF with the spray paint of your choice.
Once dry, use the spray adhesive to completely cover the front of each board and the back of the scrapbook paper. Let set for about a minute.
crafts, art, scrapbook, thrifty, decor
Place the scrapbook paper on the front of each board - Adhesive side down.
Thrifty Decor Chick nailed her art directly into the wall, however, I decided to use brackets on the back of my boards to hang them. Either way will work perfectly!
Since the "Design Rule" is to work in odd numbers, I decided to use 9 squares as shown in the Ballard Designs catalog.
This project is SUPER Simple and I really like how it turned out.
I already and the MDF and spray paint on hand, so the total cost of my inspired project was $10.38!! FABULOUS!!


DIY Day @ ASPTL

Pin It

Friday, September 11, 2009

What can $11 buy?

Well... if you are at Neimans, $11 will buy you a sock. No, not a pair... just ONE stupid sock.

If your like me and get your inspiration from Kara at Creations by Kara, $11 buys you this lamp from your local thrift store!! TOTAL AWESOMENESS!! <-- (Not a real word, but the only word to describe this insanely good deal!!)
OH!! And the best part about this lamp... It WORKS!!

This lamp doesn't need much, but I would love to fix it up a little bit to make it more "me".

Until then, this little light of mine has a home in our bar.

One last thing... see the candle holder on the bar?? It cost me $15!! See the lamp?? Yeah... it was only $11 with shades... TOTAL AWESOMENESS!!
Pin It

Monday, September 7, 2009

From Trash to Treasure

I haven't been to thrift stores much (that WILL change), but decided to go yesterday and found this for $3!! I'm not positive what it should be used for, maybe a candle holder. I have a ton of candle holders around the house, so I wanted to think of another way to use it.

And...

This is what I came up with! Not to shabby for $3!! I am always trying to figure out how to set out flatware and napkins during buffet style showers, birthday celebrations, etc. and thought this was a perfect way to do it. A little black spray paint and a good clean up and Ta-Da... a flatware holder!!

Well... at least for now!!

Pin It

Monday, April 20, 2009

This Little Light of Mine

We finished another project!
I was wanting a chandelier to hang in the downstairs bathroom and this one was found at a GARAGE SALE! It was definitely in need of a makeover.

First Step: PRIMER

Second Step: BLACK PAINT

(I LOVED the idea of a black chandelier with crystals)

AND... the finished project!

I had the crystals at home from a previous project and I think they worked just perfectly!

Now... if you could've seen the before photo of this bathroom, you would be in complete amazement of the transformation. It was just HIDEOUS!

Join me here!


Pin It