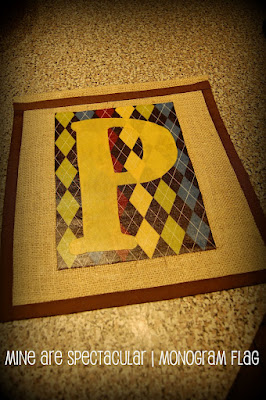
Monogrammed Burlap Yard Flag
This project is SUPER easy and SUPER inexpensive to make.
Supplies:
Burlap, Scrap of Fabric, Ribbon, Letter of Your Choice, Outdoor Mod Podge, Foam Brush, Hot Glue Gun & Clear Spray Sealer

This project is SUPER easy and SUPER inexpensive to make.
Supplies:
Burlap, Scrap of Fabric, Ribbon, Letter of Your Choice, Outdoor Mod Podge, Foam Brush, Hot Glue Gun & Clear Spray Sealer

Decide how big you want your flag. I used the flag that I already had as a guide. My flag is 12 ½ inches wide by 18 inches long. Double the burlap over lengthwise, plus add about 4 extra inches on the front piece for the hanger. So my burlap was a total of 40 inches long.
Fold your burlap to the correct length, making sure to leave the extra four inches at the top of the front panel. Then I ironed my burlap to make sure that all the wrinkles were our and to make the bottom crease lay down flat.
Use your hot glue gun and glue the bottom crease so that it lays down flat. Then hot glue up both sides of the flag. This doesn’t have to be perfect because the edges will be covered with ribbon later.
Fold over and hot glue about ¼ of an inch of the burlap at the top of front panel. This makes a clean edge. Then. Fold over the rest of the extra four inches from the front panel to make a loop at the top of the flag. Hot glue into place.
Lay your fabric out on the flag, and decide how big your want it to be. Take into account that you will be adding a ribbon border around all four sides of the flag. I cut my fabric approximately 8 inches wide by 11 inches tall.
Attach your fabric to the burlap using Outdoor Mod Podge. Then layer your paper or fabric letter on top of the fabric. Apply a coat of Outdoor Mod Podge to the top of the letter and the fabric. Let the Mod Podge dry and then reapply two more coats.
Add a border of ribbon to the bottom and sides of the flag. Do this by applying a line of hot glue to your ribbon and laying the burlap on it, then fold the ribbon over and glue it down on the other side.
As a finishing touch, I added a strip of ribbon across the top of the flag using my hot glue gun. I also sprayed my flag with clear spray sealer just to make sure that the ribbon and all the burlap were protected.
Then proudly display your SUPER cute Monogrammed Burlap Yard Flag!
Hop on over to Tatertots & Jello (Link under "Blogs I Love") and check out this project and some of the SUPER crafty things that Jen has made!
I've Linked Up to the following Blog Parties... Check them Out!


16 comments:
I absolutely LOVE this project!!! It is so cute and can be adapted to many different themes, etc. You're brilliant!!!!
This is something that we can adapt to our own homes which makes it a great thing to brag about.
Job well done.
Nice work!! I so wanna try this!
This tutorial came at a great time for me. My monogram yard flag is well, about dead and needs to be thrown away. I need something adorable in its place and I think I could make this. I'm guessing my daughter will love this post.
Thanks for linking this project to Woo Hoo! Wednesday and sharing with us. Please remember to link back to this party on your post or sidebar.
thank you for linking, Tiff! You know I LOVE it!
what a great project and many thanks for such a detailed tutorial. I might be able to do this:)
Sonny
Turned out really cute!
Love this! I'm thinking it can also work as a wall piece in a nursery or kids room. Or even the living room!
Such a clever project with good clear directions. You could do this for all seasons, too and inside. Wow, I just paint mine, guess I'll have to check this out. Thanks!
I think I need to make one!! That's an awesome idea!!
Very cute!
Judy@cutest-little-things
I love it!
Laura @ along for the ride
p.s. I have a blog party on Saturdays and I'd love it if you linked up!
That is so awesome!! I love that fabric!!
What a terrific project! I love all the materials and colors you used. It looks fabulous in your flower bed! Would love to give this a try.
What a great project. I may have to try this one....could be done for different holidays too with holiday ribbon/fabric. Thanks for sharing a great tutorial!!!
Lovin this project...something that is actually super doable!!! You could take this idea a million different directions...
Post a Comment